
What Auto ISO Does—and Why It’s Not “Cheating”
Auto ISO is a camera feature that automatically raises or lowers your sensor’s sensitivity to light as scenes brighten or darken, while keeping the aperture and shutter speed settings you’ve chosen, so your exposure remains consistent without constant manual adjustments as you move between different lighting conditions.
If you’ve been told that “real photographers shoot in manual,” it helps to unpack what exposure control actually means. Manual mode is valuable because it teaches you the exposure triangle—how aperture, shutter speed, and ISO work together. But knowing exposure is different from forcing yourself to turn three dials for every shot. Auto ISO is strategic delegation: you decide the creative look, and the camera does the repetitive math so you can stay focused on composition and light. Many working event, wildlife, and street photographers rely on aperture priority mode with Auto ISO because it responds faster than full manual when the light keeps changing. The real prerequisite is understanding what the camera is doing, not avoiding semi-automatic modes.
The Core Setup: Let the Camera Float ISO While You Control the Look
To make Auto ISO work for you, you first need a clear sense of which exposure controls matter most for the shot in front of you. Aperture priority mode (A/Av) is ideal when depth of field—the blur or sharpness of the background—is your main creative decision. In that mode, you choose the aperture and either set ISO yourself or let Auto ISO handle it within limits you define, while the camera handles the remaining settings needed for the metered exposure. Shutter priority photography (S/Tv) flips the emphasis: you choose the shutter speed to freeze or blur motion, and the camera picks the aperture. In both cases, Auto ISO fills the gap as lighting changes so you aren’t constantly chasing the meter with manual ISO tweaks. The goal is not to graduate to manual and stay there forever; the goal is to understand exposure so well that you can choose the right mode and make the camera do what you want.
One of the most powerful combinations is using Manual exposure mode with Auto ISO. In this setup, you lock in the aperture for the depth of field you want and the shutter speed for the motion you want, and the camera floats the ISO up and down as the light changes to hold the metered exposure. It is still manual in the aperture-and-shutter decisions that matter most creatively, and photographers who use it are not less serious; they are solving the problem of fast-changing light while staying focused on the scene. This is why many professional sports, wildlife, and event photographers choose to let the camera adjust ISO only, while they commit to the look they need for the subject. When you configure Auto ISO with clear limits, you are not giving up camera exposure control—you are cutting out busy work so your attention stays on timing and framing.
Step-by-Step: A Practical Auto ISO Setup You Can Use Today
Here’s a straightforward way to set up Auto ISO so your camera behaves predictably in real-world shooting. Think of this like a conversation with your camera: you tell it what you care about most, and it helps you keep exposure steady while you shoot.
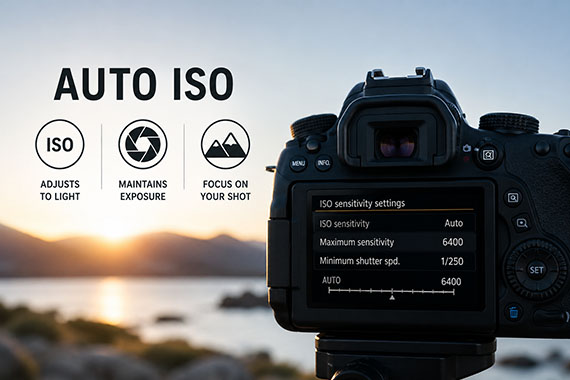
- Turn on Auto ISO in your camera’s menu, confirming that you can adjust minimum ISO, maximum ISO, and minimum shutter speed before ISO increases.
- Set a low minimum ISO (commonly 100) so the camera uses its cleanest sensitivity when light is strong and you don’t need extra gain.
- Choose a realistic maximum ISO—around 3200 for everyday walk-around photography—so the camera can respond to dim light without forcing very slow shutter speeds.
- Pick a minimum shutter speed such as 1/250 sec for casual and portrait photography, balancing sharpness against unnecessary ISO increases.
- Select aperture priority mode when depth of field matters most, and dial in the aperture that suits your scene while Auto ISO and the camera’s meter hold exposure.
- Switch to shutter priority photography and set a faster shutter speed (1/1000–1/2000 sec) when you need to freeze sports or wildlife, letting the camera choose aperture while Auto ISO protects your chosen shutter speed.
- Review your images and histograms, then fine-tune maximum ISO and minimum shutter speed if you see either noisy files or motion blur appearing too often.
Two common mistakes will sabotage this setup. First, staying in full automatic mode without learning how aperture, shutter speed, and ISO interact leaves you without a sense of what the camera is changing and why. Second, limiting the maximum ISO too aggressively—for example, to 800—sounds like a safe way to avoid noise, but when the light drops your camera has nowhere else to compensate and will resort to slower shutter speeds that often result in blurry photos. According to one widely shared exposure guide, "Auto ISO isn’t about giving up control—it’s about letting your camera handle repetitive adjustments while you focus on creativity." Keep that in mind as you test these settings: you are teaching the camera how you like to shoot, not surrendering creative decisions.
Dialing Auto ISO for Portraits, Wildlife, Sports, and Street
Different photo situations call for different Auto ISO configurations, because the priority shifts between sharpness, motion, and noise. For everyday walk-around photography—travel, family outings, casual streets—a good starting point is a minimum ISO of 100, maximum ISO of 3200, and a minimum shutter speed of 1/250 sec. This keeps image quality high while letting the camera respond quickly as light changes over the day. For portrait photography, preventing motion blur in expressions matters more than keeping ISO as low as possible, so aim for minimum ISO 100, maximum ISO 3200–6400, and a minimum shutter speed of 1/250 sec or faster for active children. Wildlife photography demands even faster speeds: minimum ISO 100, maximum ISO 6400, with minimum shutter speed around 1/1000 sec for larger animals and 1/2000 sec or faster for birds in flight so sharpness wins over a bit of extra noise. In sports, where athletes move fast, minimum shutter speeds in the 1/1000–1/2000 sec range with Auto ISO handling the rising sensitivity give you a reliable chance of freezing the action.
For street photography, scenes flip from bright sun to deep shade in seconds, and you rarely get a second chance at a gesture or expression. Recommended settings are minimum ISO 100, maximum ISO 3200, and minimum shutter speed around 1/500 sec. Many event photographers, photojournalists, wildlife shooters, and street photographers lean on aperture priority with tailored Auto ISO limits for exactly this reason: the light will not hold still, and neither can they. In each of these scenarios, you are deciding which side of the exposure triangle can flex. Auto ISO then keeps that decision intact under changing light. Once you’ve customized the minimum shutter speed and maximum ISO for the type of photography you are doing, Auto ISO becomes one of the most valuable tools your camera offers.
Takeaway: Let Auto ISO Handle the Math While You Make the Photo
When Auto ISO is set up with clear limits, it gives you solid exposure control without tying you to the slower pace of full manual in unpredictable light. You keep creative control over aperture and shutter speed, and the camera adapts ISO as the scene changes so you can concentrate on composition, timing, and working with your subject. The real gotcha is using Auto ISO without understanding the exposure triangle or with a maximum ISO that is too low, which leads straight to soft, blurry frames. Used thoughtfully, though, Auto ISO is less about automation and more about attention—freeing you from repetitive exposure tweaks and letting you respond to what is happening in front of the lens. It is worth the effort to master, and the more you practice with different configurations, the more natural it will feel to pick the mode and Auto ISO setup that matches the situation.